Alternately titled: How to make decisions about a room when you have no idea what you’re doing in said room.
It seems that this is my specialty lately.
We’ve had this sideboard sitting in our living room for a little over a year now, and for a little over a year I’ve been thinking about what I want to do with it.

(This post contains affiliate links. Click here to read my full disclosure policy.)
Sometimes I take a long time to make decisions. Apparently.
I really love the lines of this piece and how incredibly functional it is, and I love that it’s the perfect size for our slightly-awkwardly-sized entryway area. It’s not too deep (common problem with pieces we found), too short, or too tall. Basically, it’s the perfect piece. (If you’re curious, it’s the IKEA NORNAS Sideboard – it doesn’t look like this exact piece is available anymore, but they have similar ones!)
Which is why I was so scared to mess it up!
After tossing around ideas for over a year, though, I finally decided it was time to bite the bullet and just do something. The piece isn’t doing us any favors as it is – as much as I love it, the current style definitely doesn’t fit in with the rest of our living room at all, and it was time to make a change. Of course, the decision to just do something already comes with its own set of issues – we still haven’t decided exactly what direction we want to go in our living room, so that makes it a little tricky to decide on how to style such a big piece of furniture in the room!
Here’s how I approached it:
First, I thought about the elements I know are staying in this room for the long haul. I love my little desk area, so that’s not going anywhere. Our fireplace will eventually get a makeover, but the slightly-rustic, cozy feel of it isn’t going to change. I waver back and forth on our stenciled accent wall (I love it but don’t know if it fits the direction I want to take this room), but no matter what that wall will remain a focal point in one way or another.
Everything else? It’s all fair game. So, really, that left me with just a couple of elements that I really needed to worry about “matching,” and a whole lot of room for interpretation.
Which is awesome, but also stressful.
Once I had that narrowed down a little, though, I was able to think about the general feel of the elements that are staying in the room and how I can make this piece flow with them and hopefully minimize the chances of needing to give it another makeover down the line. I really didn’t want to paint the whole thing, (we already have one big painted piece in this room that is probably staying) but I also felt like if I just stained it all it would end up feeling really heavy.
So, where did I land? I decided to stain the outside of the piece, and paint the interior pieces white. The legs, back, and X-shelves are already gray, and I left them like that. This was the best of both worlds for me – it’s still bright and doesn’t feel like a giant block of wood, but it also has a little more character than it would if I had just painted the whole thing (and bonus: the stained top is a little more durable than a painted one).
Oh, and it looks pretty dang amazing, too.

I definitely recommend painting something like this before putting it together, but it’s not too hard to do afterward, either. I just stained the outside pieces (using this color, which is a new favorite!), then I taped off all of the edges where the middle and the edges meet and painted the middle shelves white.

My biggest tip when you’re painting a piece of furniture is to remember to lightly sand in-between each coat (it’s vital for a smooth finish), and to use a paint sprayer anytime you can for a more factory-like finish. I obviously couldn’t spray the shelves white, but I did use my sprayer for the polycrylic to seal the whole thing. We just upgraded to this one and I’m beyond in love with it. It’s amazing.
Let it all dry and then…done!
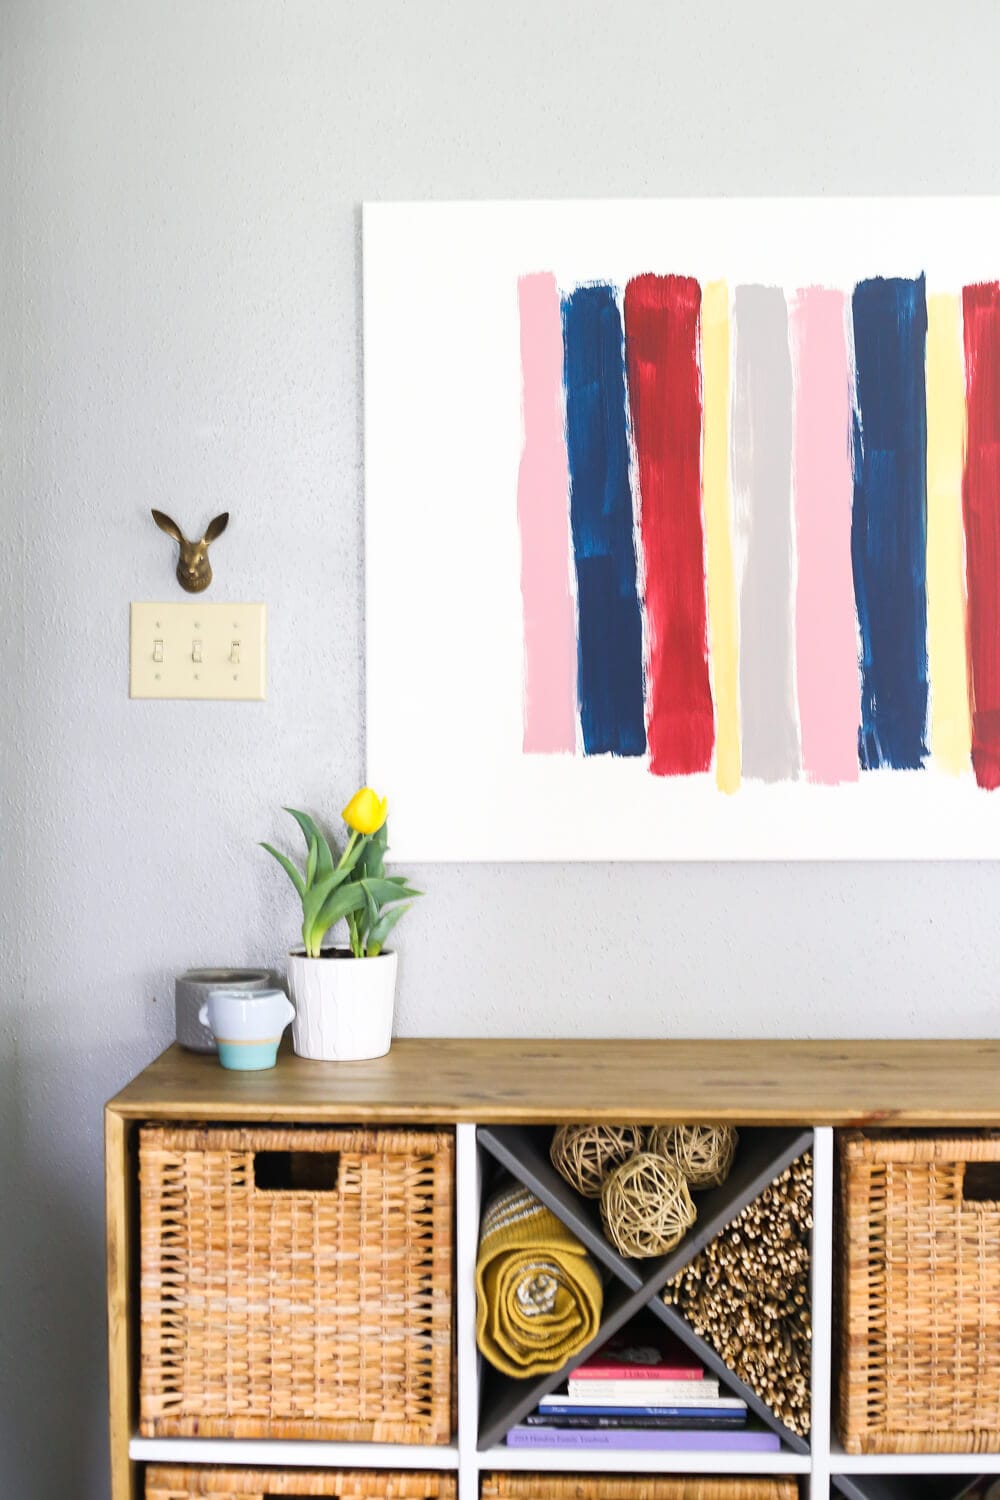
Obviously, we ended up replacing the baskets as well (we swapped them for these) – the other ones had a very modern feel to them, and while we loved them they didn’t really flow with the direction we wanted to go with this piece. We’ve moved the old ones to the garage for now, and I’m thinking we’ll probably try to incorporate them in that room as part of the storage.
Once I had it all painted and back in place, the next issue I had to deal with was what in the world to do with those X-shaped wine racks. I love them in the piece and they look so pretty, but I had a hard time deciding what I could put in them other than wine.


I started with our photo books – there are a ton of them, so I always have a hard time figuring out where to put them. I spread them out over a few shelves, then I grabbed some blankets, rolled them up, and added them to the mix. Then? I stared at the stupid thing for about half an hour trying to come up with what else I could put on the shelves. I ended up heading to the store and picking up these little round vase fillers and a big bunch of faux bamboo. I squeezed three vase fillers into two different shelves, then I cut up the bamboo into smaller pieces and stuffed it into the last one to add a fun, natural feel to it. I love how it turned out, and it makes me wish I would have bought more bamboo so I could have done it to a few shelves!


Later this week, I promise I’ll be back with a (super easy) tutorial for how I made that brushstroke art above the sideboard. It was beyond simple to do, and I swear to you I can’t paint.
Oh, and a side note – I bought another plant (see! I told you I was going to turn into a crazy plant lady). They had potted tulips at Trader Joe’s the other day, and I decided to give it a go. Any tips on keeping it alive? According to the tag it came with, it’s going to be a bit more finicky than the other plants I have…I’m feeling a little nervous about this situation.
I can do this. Right?


With this piece, I finally feel like I’m getting a little bit of an idea of the direction I want to take this room. It’s a little farmhouse, a little modern, and a lot of texture. This makes me really excited to make some other changes in this room and see it all start to come together.
I’d love your input for where to go with this room next – what should we do with the stencil wall? Leave it? Shiplap? Wood feature wall? Help!
The post IKEA NORNAS Sideboard Makeover appeared first on Love & Renovations.